OAuth 2.0 - Token management
Theory and tutorial on how to manage OAuth 2.0 access and refresh tokens. When and how to refresh.
Once we have the access tokens (by following the steps in part 2), we can happily use it to do our business on our user's behalf. But access tokens are short-lived and making our users log in and give us permissions every time will not make a great experience. Luckily for us, we also have refresh tokens. How and when should we use these? I'll discuss these topics in this article.
This is the third part of a series on OAuth and OpenID Connect. If you are interested in the theory, or the basics of implementing it make sure to check out those posts too. In this one, we will continue work on the code created in part 2.
A recap on the tokens
Access tokens are short-lived strings that grant us access to some resources. Their short lifespan serves security purposes. A stolen access token will expire soon, limiting the possible damage, but on the other hand, making our lives a bit more difficult. Once the token has expired we can't access the resources anymore. We have to ask our customer to go through the whole authorization flow once again, so we can get a new access token. This is not a good user experience I can tell you that.
Refresh tokens to the rescue!
Refresh tokens are a different kind of token that's purpose is as their name suggests, to let us refresh the access token without user interaction. For this, we can use the same /token endpoint on the authorization server, but with a bit different parameters.
/token endpoint usage refresher
As we have seen in the previous chapters, with the following HTTP call, we can exchange our authorization code for tokens, during an authorization-code flow.
POST https://authserver.com/token content-type: application/x-www-form-urlencoded Authorization: Basic MTIzOmFiYw== grant_type=authorization_code code=1234ABC redirect_url=https://awesomeapp.com/callback
We have to call the token endpoint with the following
POST https://authserver.com/token

content-type: application/x-www-form-urlencoded
Authorization: Basic MTIzOmFiYw==

grant_type=refresh_token
refresh_token=<refresh token goes here>
What changed is the grant type which is now refresh_token instead of authorization_code. And instead of a code parameter, we will have to provide the refresh token itself.
The result of calling this endpoint will be exactly the same as for the initial token exchange. We should get a new access_token and a new refresh_token too. There is a configuration on the authorization server-side called refresh token rotation. If this is turned on then after using it, the refresh token will be invalidated immediately or within a short time period. This is also for security, there won't be old dangling refresh tokens expiring in months providing possible attackers a way to get access tokens to the service. Also using this technique a refresh token is basically one use only, making reusing old tokens impossible, improving security once again. This method however implies that on token refresh we not only need to save the new access_token but the new refresh_token too!
When to refresh?
At first one may think that I should refresh the access token once it has expired. The question then becomes how can I tell that it has expired? I can call the resource server API and if I get 403 token expired response then it is expired, this is a way to tell it, but a not too efficient one. A bit smarter approach is that whenever we got the token, the response also contained an expires field that told us how long the token is good for! Before we use the token we can check this and tell if it is expired or not, saving us one failed API call which is valuable time and resources.
As we have seen in the previous part of this OAuth series, the tokens were saved in the following format
public record Token (
    String accessToken,
    Instant accessTokenExpiresAt,
    String refreshToken,
    Instant refreshTokenExpiresAt,
    Instant createdAt,
    long userid) {
}
When we want to use the token we will do the following:
- Get the above record containing the token from the database
- Check the accessTokenExpiresAt date
- If our token is still good, go ahead with the call
- If it is expired (or expires very very soon), do a refresh
- Save the refreshed tokens to the database
- Go ahead with the initial call but use the new tokens
Check the code
In code, this logic can be very nicely contained within a TokenService. In our example, it looks like this.
public Token getToken(long userId) {
    Token token = tokenRepository.findByUserId(userId)
        .orElseThrow(TokenNotFoundException::new);

    if (token.accessTokenExpiresAt().isAfter(Instant.now().plusSeconds(5))) {
        return token;
    }

    if (token.refreshTokenExpiresAt().isBefore(Instant.now())) {
        throw new TokenExpiredException("Refresh token expired!");
    } else {
        return refreshToken(token);
    }
}
First, we check the database, if a token is not found for the given user, we throw an exception. This is an invalid case and should not happen if we get to the point where we call this method.
Next, we check whether the access token is still valid. I like to use a few seconds there as a buffer in case our use of the token comes later in the code and a little time passes by then. If the token is still valid we return it.
If the access token has expired we have to refresh it. First, there is a check on the refresh token whether that is expired or not. If that is expired then there is nothing we can do, just to throw an exception. An expired refresh token means that we must make the user go through the whole authorization flow once again, there is no way for us to make the connection alive again in the background. But if we are lucky and it is still good we can go forward with the refresh process.
private Token refreshToken(Token token) {
    Token newToken = authorizationService.refreshToken(token);
    return tokenRepository.save(newToken);
}
The effective token refresh happens in the authorization service, which does the refresh call to the auth server as described above. The new token is then saved to the database and returned. We can use it now for our business logic.
Is this all?
Okay, so this solves the first refresh issue in a smart and efficient way. But wait, do we have to refresh other times? We may have to since as we have seen refresh tokens have expiry dates too! It is up to us whether it is okay to make our customers reauthorize their third-party connection every few months, but if not, we should write a piece of code that looks for expiring refresh tokens and do a refresh in time, a few days or a week before it expires. This must be a scheduled service, we can run it every night or so. The database query should be very efficient though, since there may be thousands of tokens that it must look through.
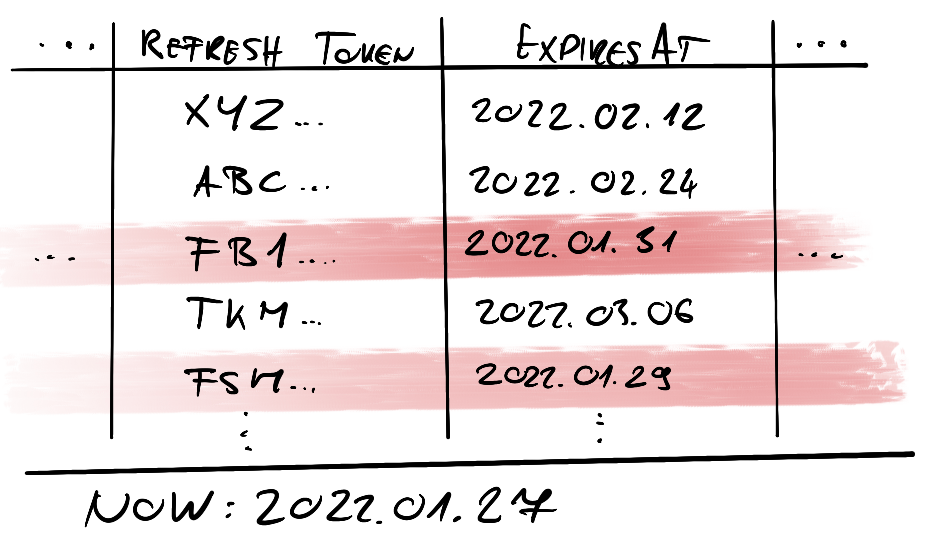
If our customers are active or we are actively using their set up connection this task will have little to do since the expiring access tokens will trigger refreshes anyway. If we don't use a connection for a long time, this little logic can save the user from reauthorizing when they come back to us.
Summary
This is the last piece of the 3 part story I wanted to write about OAuth.
In part 1 we have seen what OAuth is and what it is not, and how can OpenID Connect help us do both authentication and authorization.
The second post was a tutorial with code examples on how to implement a basic OAuth connection from scratch in Spring Boot.
In this third part I have covered how and when should we refresh the tokens to keep our connections alive and customers happy.
In the future, the series may continue with more details on some specifics, but these 3 chapters should cover the basics.
The working code example for this post is available on GitHub.