OAuth 2.0 - Implementing a client
Implementing an OAuth 2.0 client in Spring is easy. This post shows you how.
This is the second part of my series on OAuth 2.0 and OpenID Connect. In this post, I'm going to show you a way, how you can very quickly and easily implement the authorization-code flow in Spring Boot, that we have examined in the previous chapter. Let's jump right in.
The basics
There are two major ways of doing this in Spring. You can use the Spring security provided OAuth client implementations which work very well, but just as Spring itself is a bit opinionated, and tailored to more classical web applications rendered on the backend from templates. In my opinion, those OAuth clients are more difficult to use with a modern SPA or mobile clients as part of a RESTful API.
Luckily we can implement it ourselves very easily and I will show you just that. In spite of all these, it is worth checking out the Spring provided implementations, the documentation and tutorials can be found in the official docs.
Prerequisites
Tech
I'm going to use Spring boot 2.6.2 with Java 17 LTS, but the solution should work with older versions too, I'm not using anything fancy (as far as I know). You will also need your favorite IDE, a browser, and a REST client. For these, I use IntelliJ, Chrome, and Insomnia.
Platform to test against
To be able to test the app, I have set up a Google Cloud OAuth client id for myself.
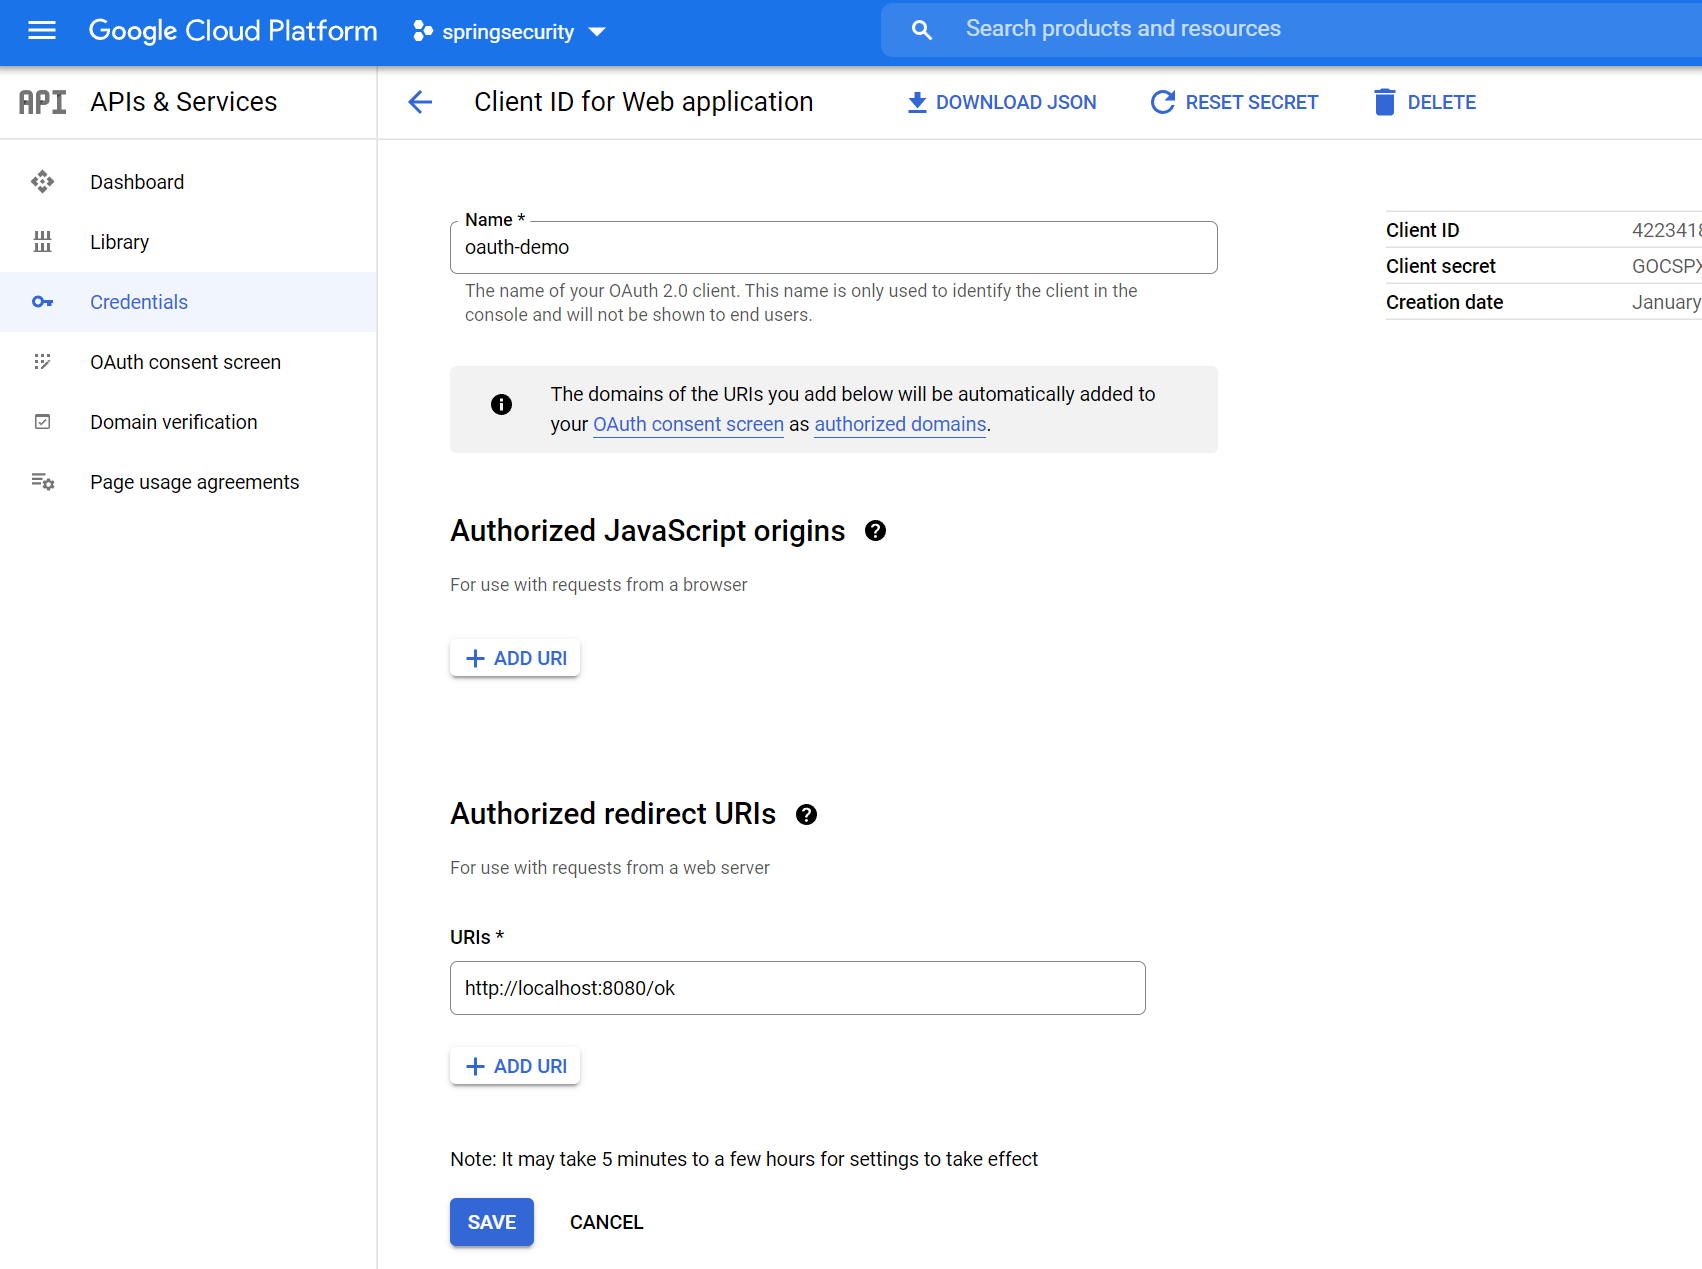
This is something you can do too if you want to follow this tutorial to the letter. Things like where to put parameters (auth header or url encoded body) are not carved in stone in OAuth, so there are small differences between authorization server implementations that you may face. Always read the documentation. If you want to follow the Google setup, here is documentation that may help you. The most important things, as seen on the screenshot above are:
- App name - can be anything, just fill it out
- Authorized redirect URLs - these can be anything, in a normal scenario this would be where the auth server redirects the browser after consents are given, and the URL is the URL of your web app. For our backend only demo, any URL will do.
- Take note of the client id and client secret in the top right corner, we will use those later
The coding
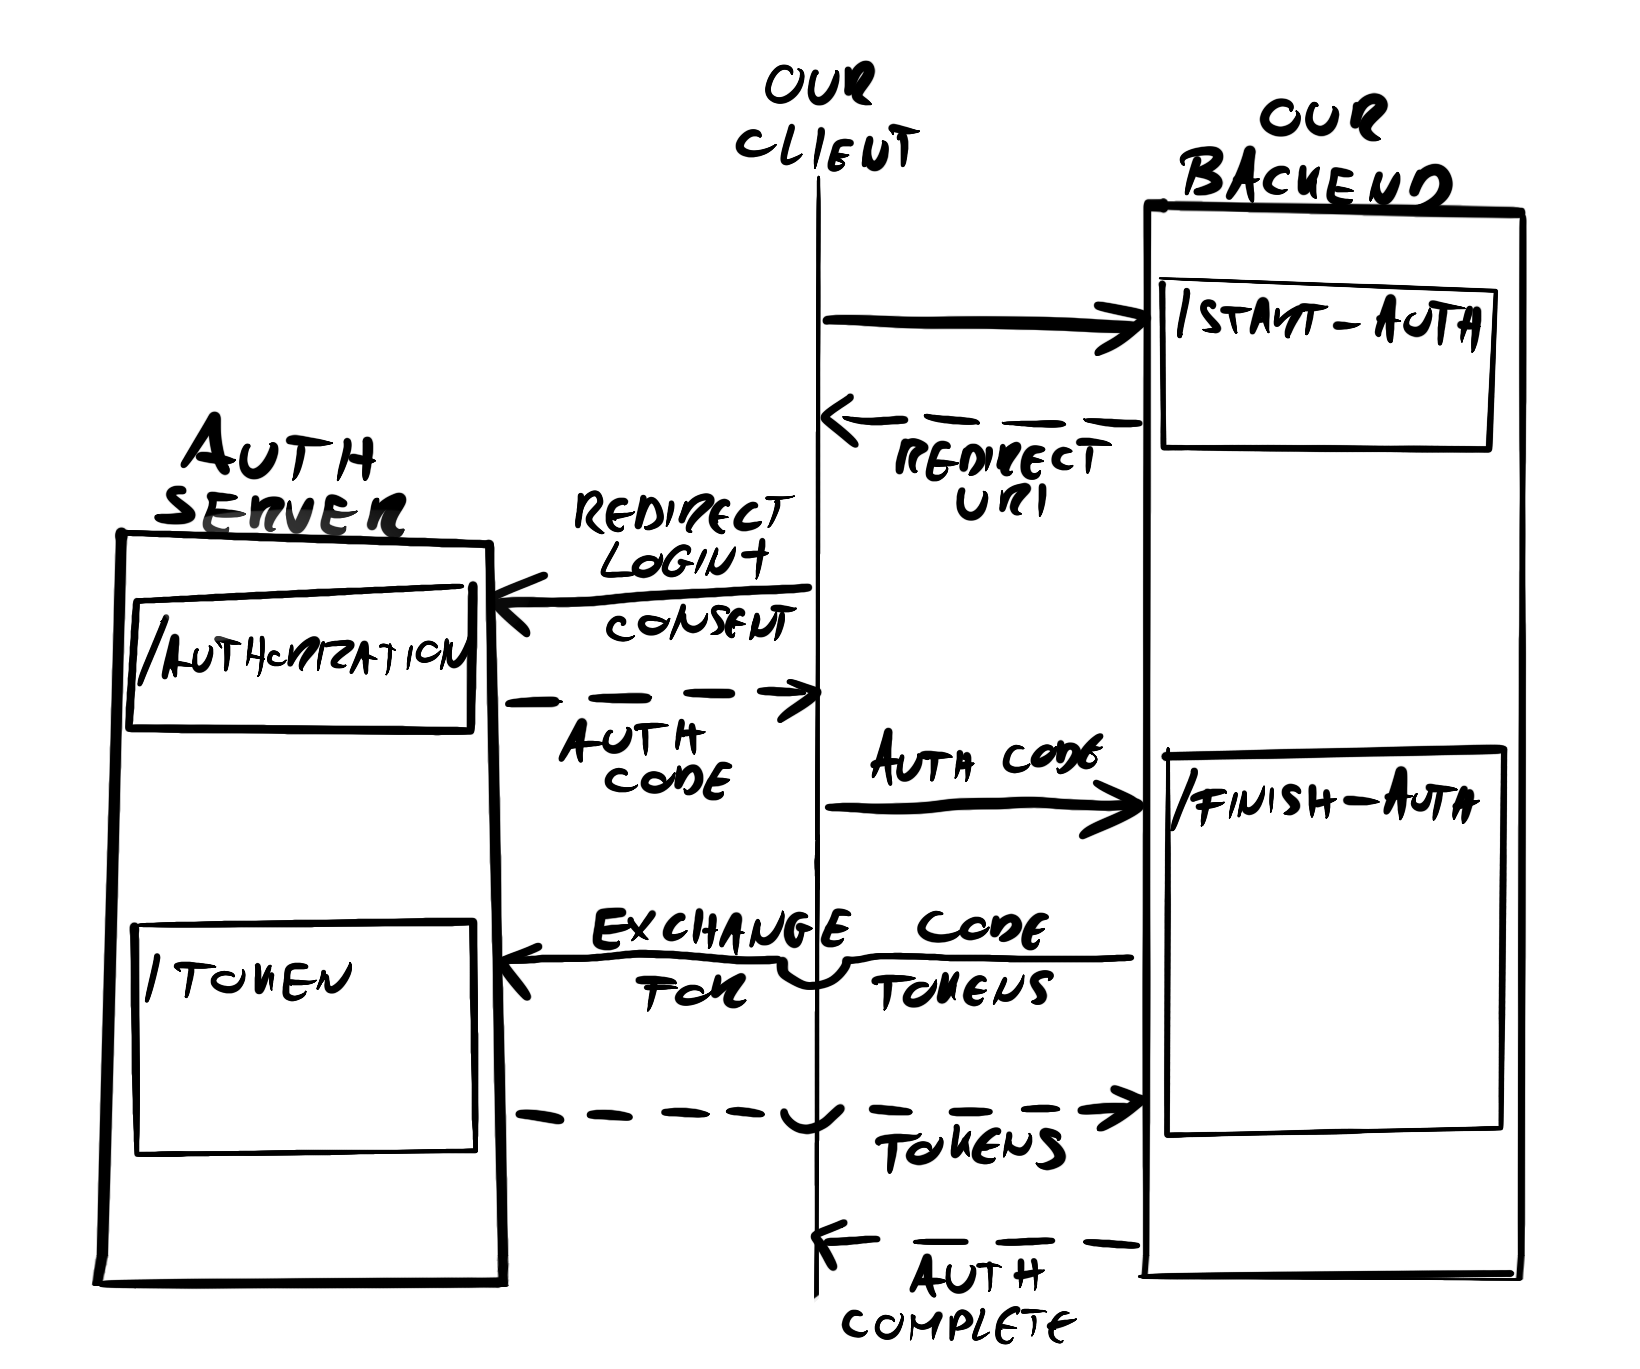
We are going to set up a super basic Spring Boot project and implement a logic that follows the authorization-code flow as described in the previous post. The following diagram shows our logic flow and communications at once!
Let's get to it!
Setting up the project
I have created the skeleton using the Spring initializr with the exact following settings. It is very little we need for this.
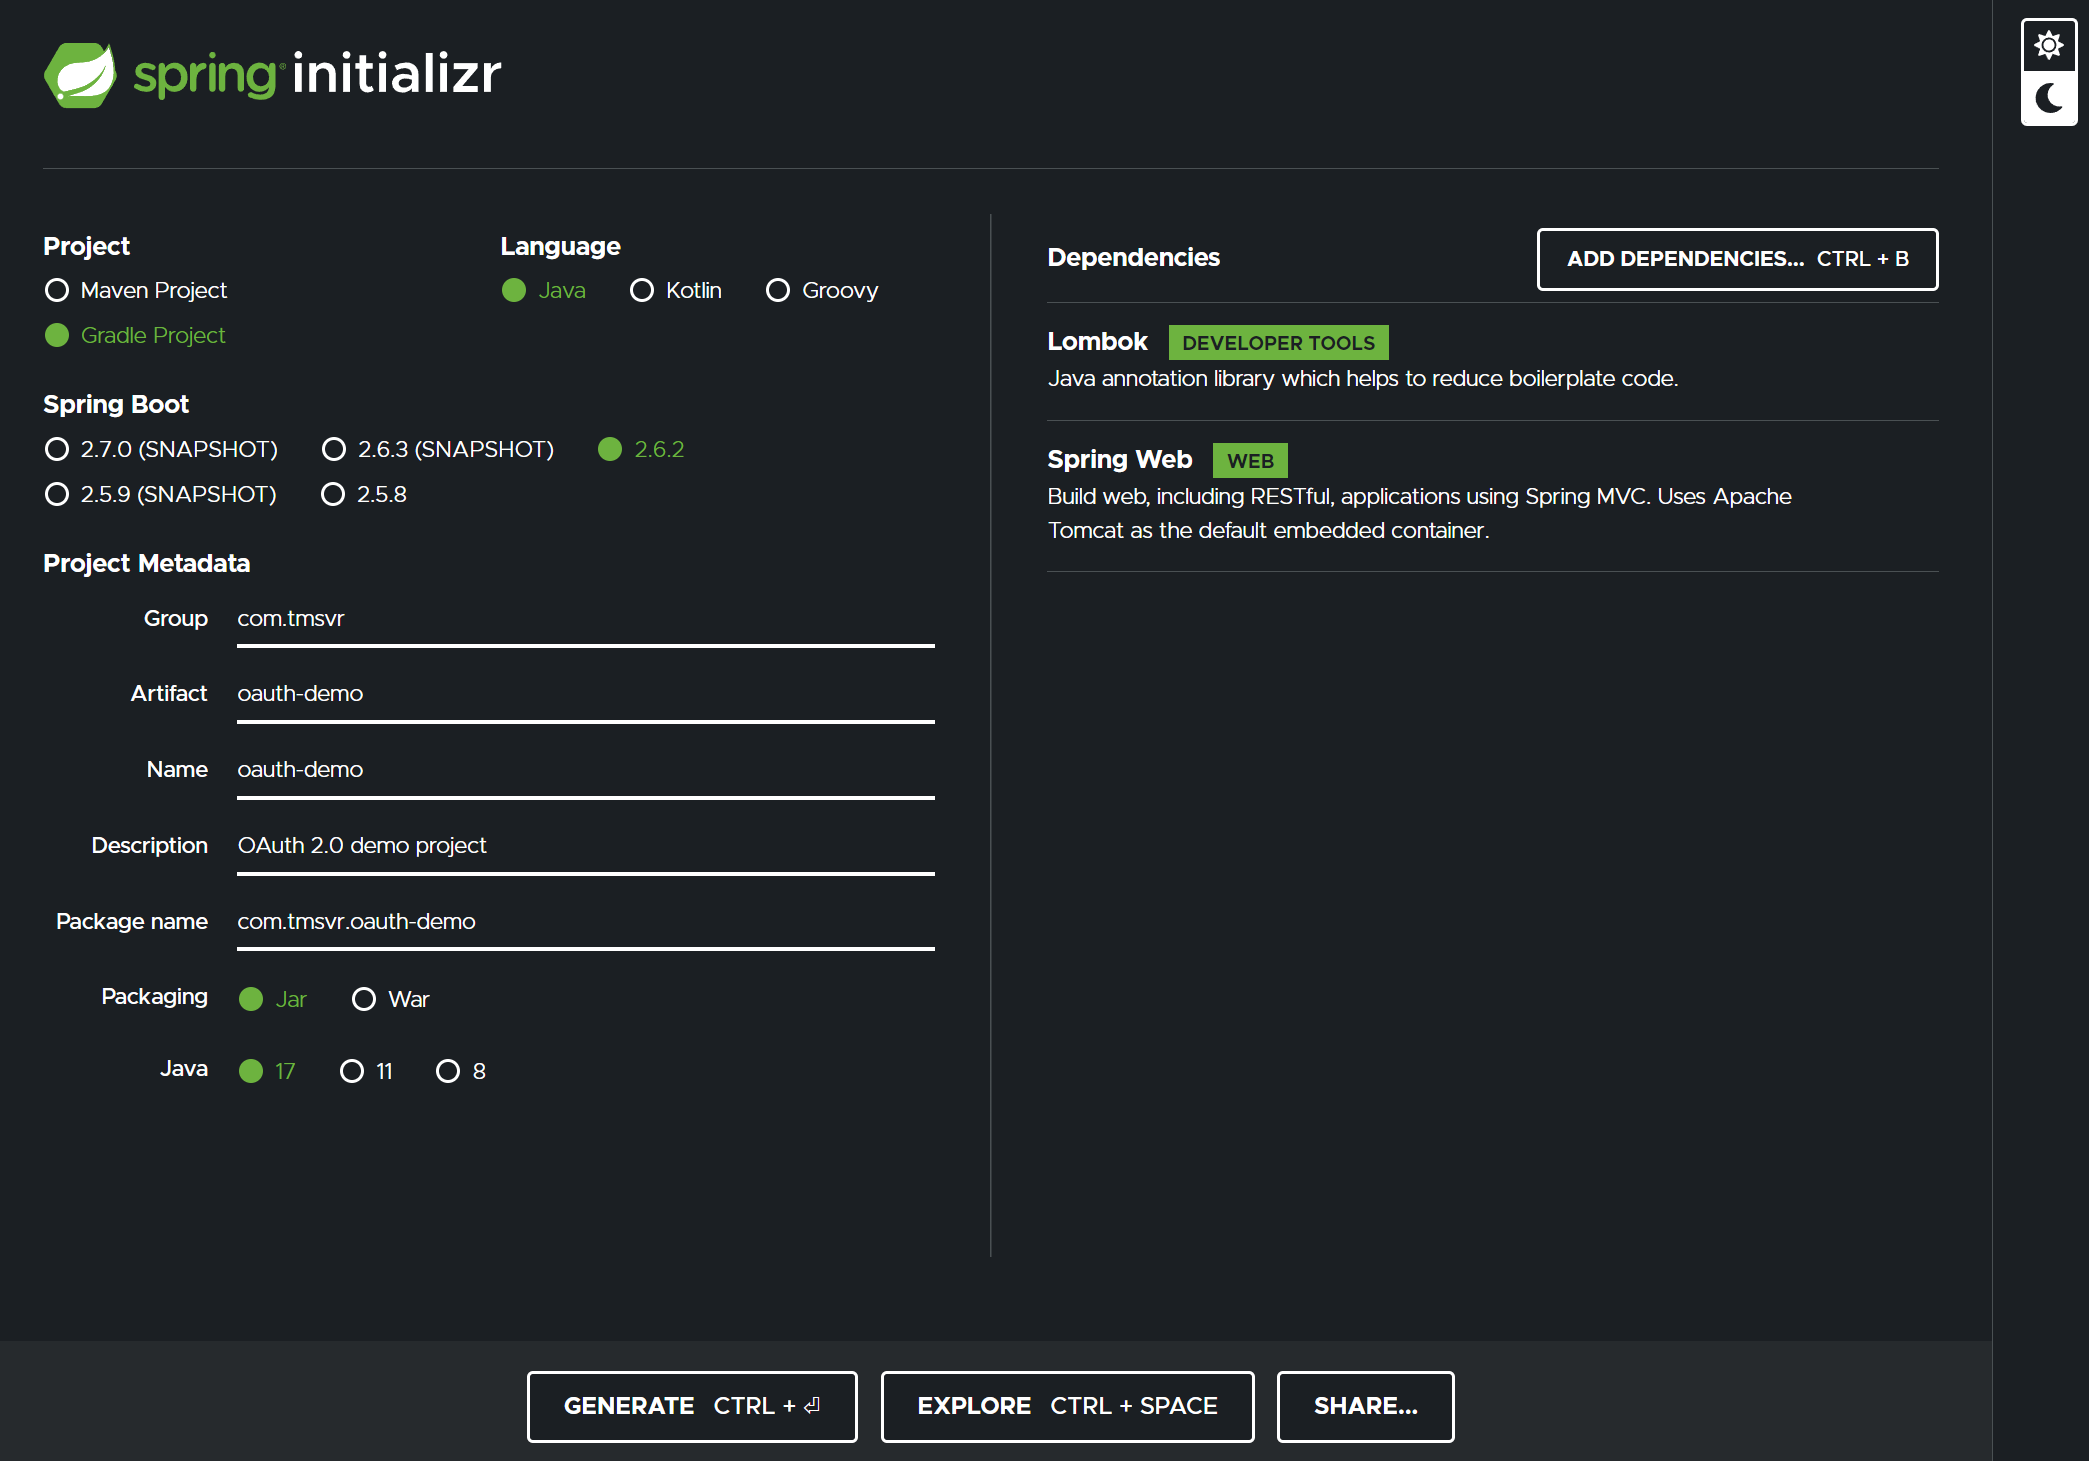
We need Spring Web to create API endpoints and Lombok for convenience. That's it.
The next thing to nail down is properties. We want to externalize a few properties, so I have added the following application.yml file
awesomeapp:
  oauth:
    client-id: something.apps.googleusercontent.com
    client-secret: secret
    auth-url: https://accounts.google.com/o/oauth2/auth
    token-url: https://oauth2.googleapis.com/token
    redirect-url: http://localhost:8080/ok
    scopes: openid profile
Here we have to set up a few things:
- client-id and client-secret - client id and secret, created on Google Cloud (I said we will need it)
- auth and token URLs - these are the 2 main URLs of an authorization server for getting the auth code (auth URL) and exchanging the code for tokens (token URL)
- redirect-url - this is the URL where the user is redirected after giving consent. Normally this would be a URL handled by our frontend application. Now for this demo, this could be anything (registered on Google cloud as shown earlier)
- scopes - these are the OAuth scopes or permissions we want the user to grant to us, separated by spaces
To be able to read it I created a @ConfigurationProperties record.
package com.tmsvr.oauthdemo.config;

import org.springframework.boot.context.properties.ConfigurationProperties;
import org.springframework.boot.context.properties.ConstructorBinding;

@ConstructorBinding
@ConfigurationProperties("awesomeapp.oauth")
public record OAuthConfig(
        String clientId,
        String clientSecret,
        String authUrl,
        String tokenUrl,
        String redirectUrl,
        String scopes
) { }After all this, we can start to write some REST controllers.
The Controller layer
Our only controller will be very simple. As seen on the communications diagram we will have 2 endpoints only. One is where the client can ask for a redirect URL to start the whole process, and the other is where the client can send the results of the authorization (auth code).
package com.tmsvr.oauthdemo.rest;

import com.tmsvr.oauthdemo.service.AuthorizationService;
import lombok.AllArgsConstructor;
import org.springframework.http.HttpStatus;
import org.springframework.http.ResponseEntity;
import org.springframework.web.bind.annotation.*;

@AllArgsConstructor
@RestController
@RequestMapping("/api/authorization")
public class AuthorizationController {

    private final AuthorizationService authorizationService;

    @GetMapping("/start-auth")
    public ResponseEntity<String> getRedirectUrl() {
        return ResponseEntity.ok(authorizationService.getAuthorizationUrl());
    }

    @PostMapping("/finish-auth")
    public ResponseEntity<Void> finishAuth(@RequestBody FinishAuthRequest finishAuthRequest) {
        authorizationService.finishAuth(finishAuthRequest.code(), finishAuthRequest.state());
        return ResponseEntity.status(HttpStatus.OK).build();
    }
}
Both controllers just delegate to the AuthorizationService.
/start-authprovides aGETendpoint for our clients where they can get the URL they have to redirect the user to give consent. Because the state parameter in this URL is computed and stored by the backend it is better to generate the whole URL there./finish-authis aPOSTendpoint that the client can call after it got the authorization code from the callback from the authorization server. The auth server could call this endpoint directly, but what would our clients (web, mobile) do then? They redirected the browser to an external page we should get back to the flow somehow and I think this is the easiest way. Let the clients handle this redirect and call the backend with the results.
The Authorization service
The AuthorizationService is where the magic happens! Its two public methods serve the 2 controller endpoints.
One is simple, putting together the authorization URL from the properties we have set up earlier.
public String getAuthorizationUrl() {
        return oAuthConfig.authUrl() +
                "?response_type=code" +
                "&redirect_uri=" + oAuthConfig.redirectUrl() +
                "&client_id=" + oAuthConfig.clientId() +
                "&scope=" + oAuthConfig.scopes() +
                "&state=" + generateState() +
                "&access_type=offline";
    }
The finishAuth(String code, String state) method is a bit more complex but not too much. It is responsible for three things:
- Validate the state parameter, it must be exactly the same that we have put into the authorization URL in
getAuthorizationUrl. The state should be random, or generated from some user properties, but definitely not a constant. As this is an important part of making OAuth secure, please set this up properly. - Do the token exchange, where we exchange the authorization code for the access, refresh and id tokens. For the API call, I use RestTemplate as it comes with Spring and is very convenient. Most of this method is just putting together the call itself. You can see many familiar parameters here from Part 1 of this series. As I have mentioned before, authorization servers may take these parameters differently. In the previous post, the client id and secret were passed in the
Authorizationheader, for Google, those must be in the body with the other parameters. (Always check the docs!) As a result of the API call, we get our tokens. - The final task of this method is to save the tokens to the database.
And all these three steps together look like this.
public void finishAuth(String code, String state) {
        checkState(state);

        Token token = exchangeCodeForTokens(code);

        tokenRepository.save(token);

        log.info("Auth successful. Token saved to database {}",
        	token.refreshToken().substring(
        		token.refreshToken().length() - 4
            )
        );
    }
The code is very simple, the most "difficult" part is setting up the RestTemplate call to the auth server. The exchangeCodeForTokens is the method where it is done and the tokens are exchanged.
private Token exchangeCodeForTokens(String code) {
        String tokenUrl = oAuthConfig.tokenUrl();

        HttpHeaders headers = new HttpHeaders();
        headers.setContentType(MediaType.APPLICATION_FORM_URLENCODED);

        MultiValueMap<String, String> map = new LinkedMultiValueMap<>();
        map.add("grant_type", "authorization_code");
        map.add("client_id", oAuthConfig.clientId());
        map.add("client_secret", oAuthConfig.clientSecret());
        map.add("redirect_uri", oAuthConfig.redirectUrl());
        map.add("code", code);

        HttpEntity<MultiValueMap<String, String>> request =
        	new HttpEntity<>(map, headers);

        RestTemplate restTemplate = new RestTemplate();
        TokenResponse response = restTemplate.postForEntity(
        	tokenUrl,
            request,
            TokenResponse.class
        ).getBody();

        return new Token(response.getAccessToken(),
                Instant.now().plusSeconds(response.getExpiresIn()),
                response.getRefreshToken(),
                Instant.now().plus(30, ChronoUnit.DAYS),
                Instant.now(),
                1L
        );
}Persistence
The persistence is not too important in this example (it will be later!). For now, I just created an in-memory implementation of a simple repository so I can save the tokens somewhere.
package com.tmsvr.oauthdemo.persistence;

public interface TokenRepository {
    Token save(Token token);
}
And it is done.

Let's try it out already!
Ok so what we have to do is to spin up our application, it should start in 1-2 seconds (let's enjoy this speed, rarely seen from a more complex Spring app). The running app will be available on localhost:8080.
The first thing to do is to call the start-auth endpoint to get the URL where the user should be redirected to.
curl --request GET --url http://localhost:8080/api/authorization/start-authAs a response we should get an URL, something like this one:
https://accounts.google.com/o/oauth2/auth
?response_type=code
&redirect_uri=http://localhost:8080/ok
&client_id=something.apps.googleusercontent.com
&scope=openid profile email
&state=dont-do-this
&access_type=offline
Paste this URL into a browser, this will lead us to the Google login and consent screen. Immediately after those, we will be redirected to the redirect_uri that we have provided. Since there is no website there a 404 page will come up, but in the address bar, we will see the code parameter, which is the authorization code we need.

Copy that code and use it in the second call to our backend (normally our frontend app would do this part). Be careful as the code we got is URL encoded and must be decoded before use!
curl --request POST \
  --url http://localhost:8080/api/authorization/finish-auth \
  --header 'Content-Type: application/json' \
  --data '{
	"state":"dont-do-this",
	"code":"<the code we got in the URL>"
}'
For this call, we should also get a 200 OK response, and a line of log on the backend about the successful auth. Be free to experiment with the code, see what kind of tokens you get. Explore the id token for example and its content.
Final thoughts
As you can see this implementation is really easy. However in this case there is basically no error handling, useful persistence, security, and a lot of things I have omitted to make the tutorial focused. In a more serious situation all those should be properly handled.
The full code is available on GitHub.
In the next episode, I will compare two kinds of token management concepts about how and when to refresh tokens.