OAuth 2.0 - A practical intro
A practical intro into OAuth and OpenID Connect. How to authorize and authenticate.
Intro
Most of the confusion around OAuth 2.0 comes from the fact that people may not know that it is an authorization protocol and not an authentication one. If I, the developer of AwesomeApp want to access my user's Facebook data or do actions in their name on Facebook the OAuth 2.0 protocol enables my customer to let me do so without giving out their username and password to me. So the question "OAuth that's the thing I can do social logins with, right?" is not correct. However, so many people tried to do exactly that using various "hacks" that OAuth 2.0 was extended with the OpenID Connect addition and the two together enables us to authenticate and authorize users as well.
This is the first part of a series on OAuth and related technologies/practices. This piece serves as a tl;dr for all the OAuth blog posts out there, so the series can be complete. You can find links to some very nice OAuth and OpenID Connect explanations at the end of the post, which I highly suggest reading besides this one if you want to broaden your knowledge.
The basics
Let's start with some definitions
- Authentication is verifying a user's identity (OpenID Connect)
- Authorization is granting access to resources (OAuth 2.0)
OAuth has a few actors that play parts in the authorization game
- Authorization server — The entity that issues access tokens
- Resource owner — Our user who wants to grant us access to their resources handled by the resource server
- Client — This is our application, requesting the access token and using it while accessing the resources
- Resource server — In the presence of a valid access tokens grants access to the resource owner's resources
And also a few other concepts
- Access token - a usually short-lived token, providing access to resources
- Refresh token - a usually long-lived token, that we can use to get new access tokens without user interaction
- Scopes - these are groups of permissions that the user can consent to give to us during the authorization flows
- ID token - an extra token as part of the OpenID Connect specification, this token holds information about the user, that we can get from the authorization server
- client id, client secret - in order to use an authorization provider we have to register our application there. During this registration, we will get a client id and client secret that we will need during the auth process
The goal of the client (AwesomeApp) is to receive an access token from the authorization server (Facebook, Google, etc) and use it when contacting the resource server (Facebook, Google, etc) to do things (get data, make a post, anything) in the name of the resource owner (the user). There are multiple flows (or grant types), in which the client can get the access tokens. Which flow to use depends on what kind of client we have.
- Authorization code - applications where there is a backend side, providing a secure way of receiving and storing the access token
- Authorization code with PKCE and Implicit - client apps web, mobile, etc without a backend participating in the flow
- Client credentials - server to server communications, no client
Authorization code flow
Since the authorization code flow is one of the most common ones and this is the one I will talk about in the following posts, I'll concentrate on that one here.
This flow should be used whenever there is a backend for our application that can handle secure communications with the authorization server and can safely store the received access token (so for most client-server applications). The flow works like this:
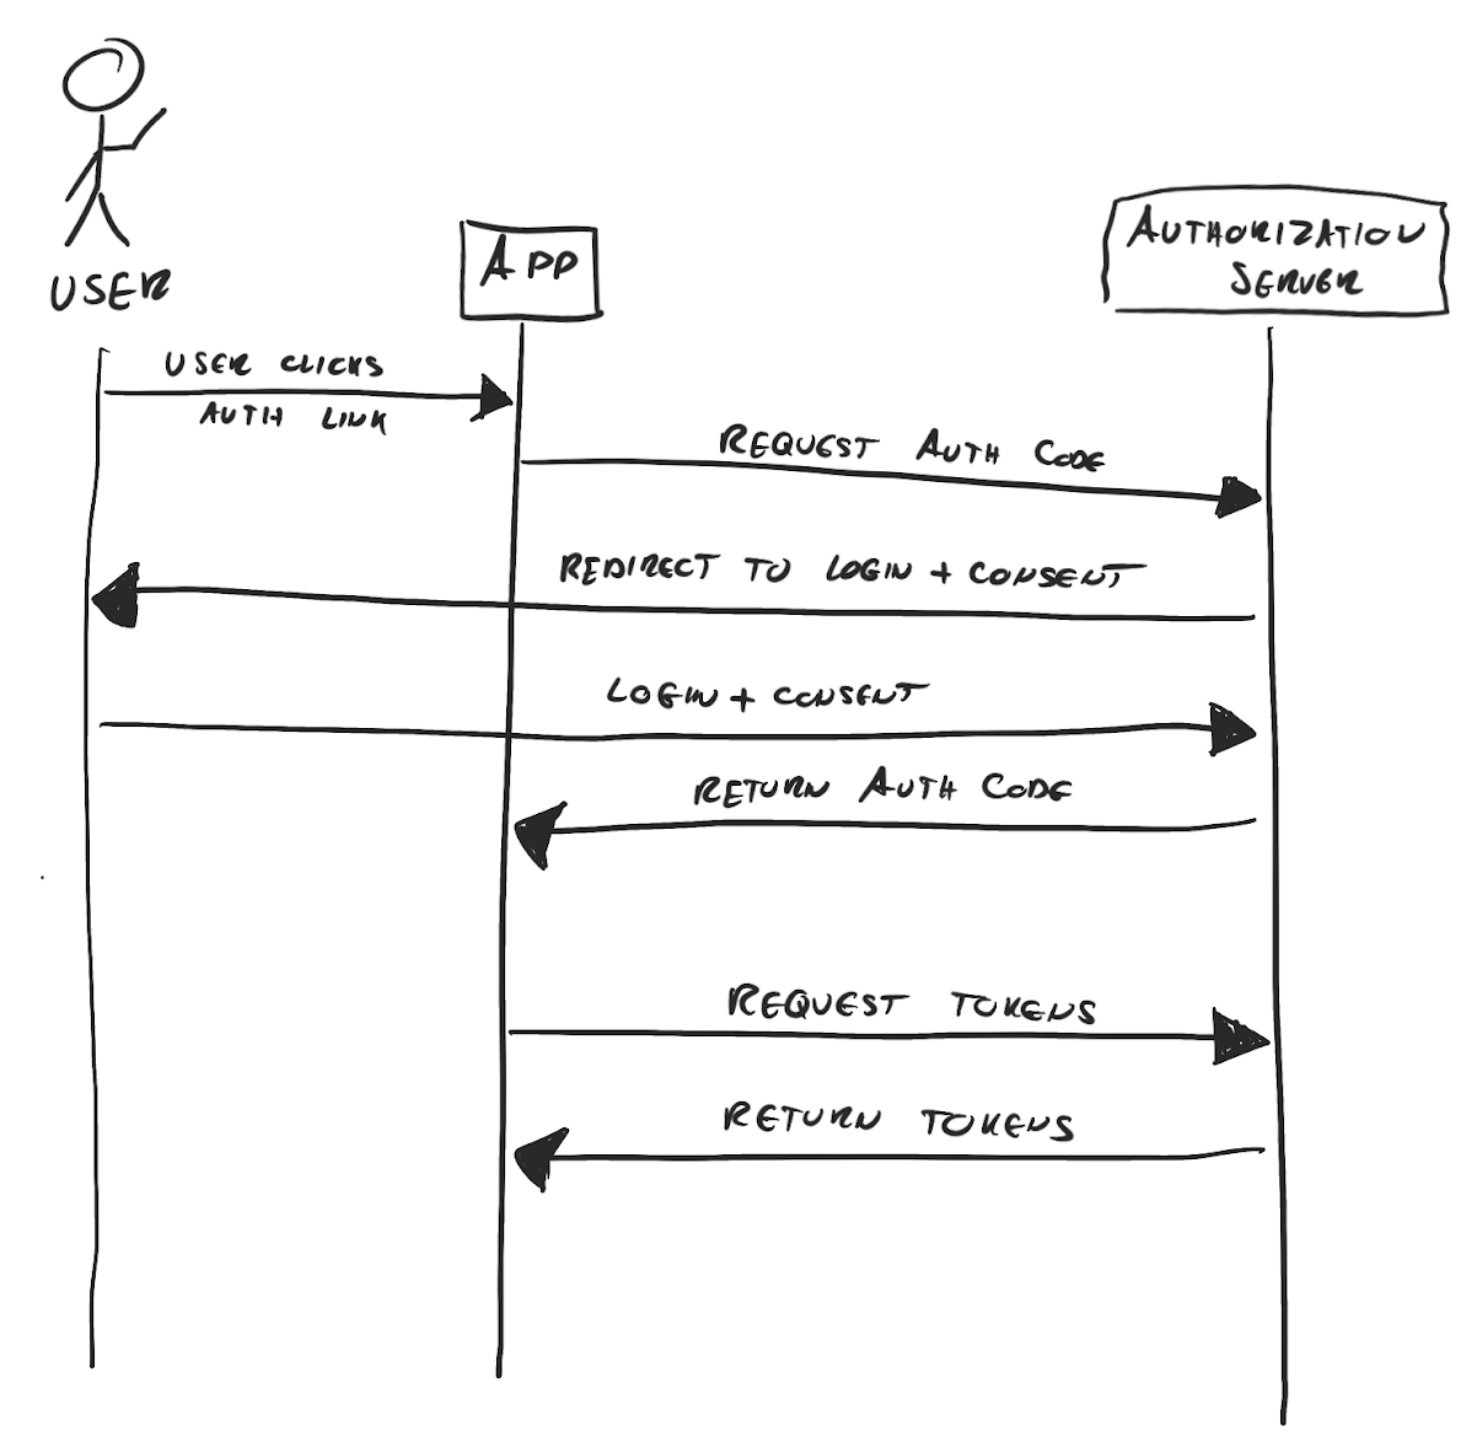
Step one - redirect to login / consent
In the first step, the user clicks an authorize button on our UI. This triggers a redirect to the /authorize endpoint of the authorization server.
GET https://authserver.com/auth?redirect_uri=https://awesomeapp.com/callback&response_type=code&client_id=123&scope=openid email&state=qwe2fThe first three parameters are required by the OAuth spec, the others depend on the authorization server. There could be many other parameters as well specific to the given authorization provider, therefore it is always a good idea to read the docs.
- response_type - required and must be
code - client_id - required, client id of our application
- redirect_uri - required, the URL where the auths server should redirect back after user consent
- state - security string, highly recommended. Should be generated by our code, and checked after the client is redirected back
- scope - the scopes we want the user to consent to. If the auth server supports OpenID Connect we can provide the
openidscope here, which will cause the auth server to return an id token in Step 3.
Step two - the redirect back
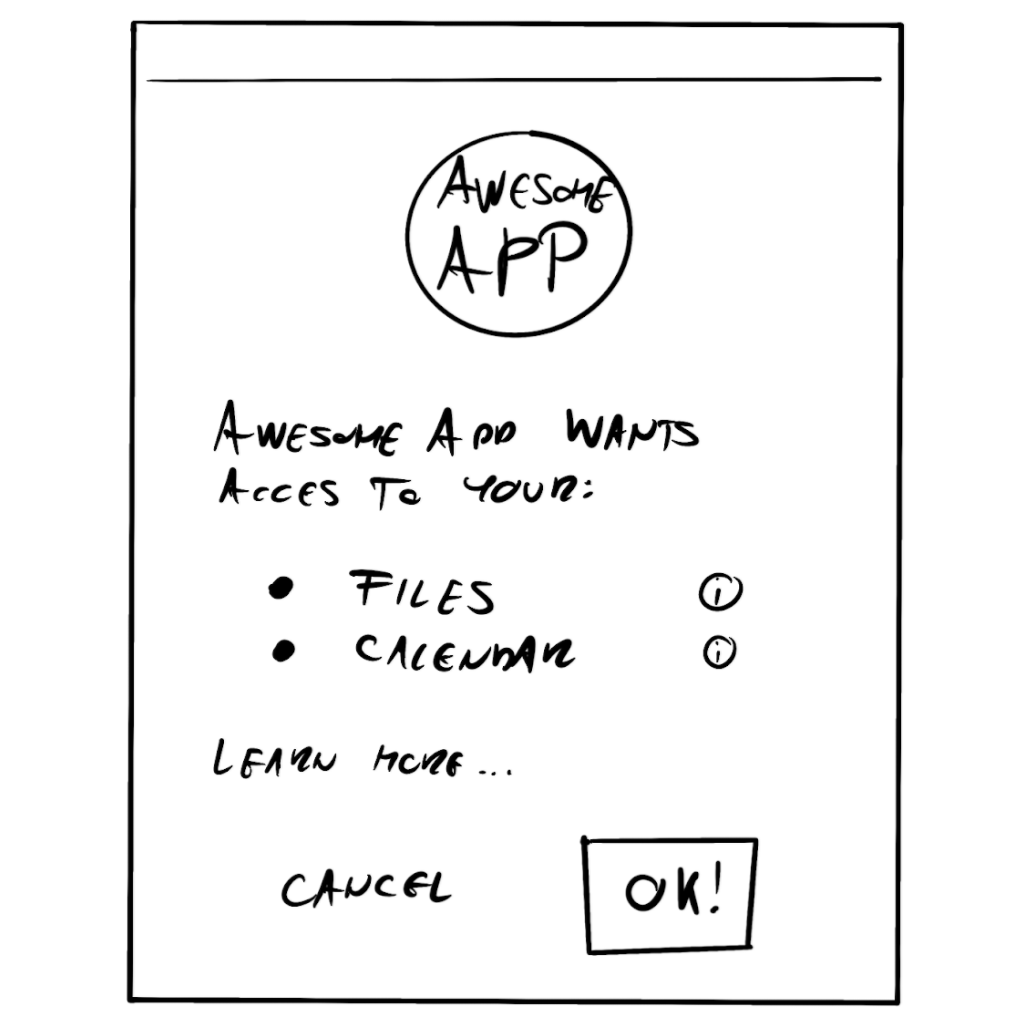
After we have navigated the client to the /authorize page of the auth server they will see a login screen if there is no active session yet with the auth provider. They may have to choose a profile to log in with, but when the login is completed, the consent screen appears, where they see our app, and the scopes or permissions we want them to give us.
If they accept, the auth server will redirect them back to our app, to the URL that we have provided in the redirect_url parameter in the previous step. The auth server attaches 2 query parameters to that redirect_url.
https://awesomeapp.com/callback?code=1234ABC&state=qwe2f- state - the exact same state string we have provided in Step 1. At this point, our app should check this and only continue if they match.
- code - the authorization code we can exchange for tokens
This call from the auth server is either handled by our backend directly, or more commonly caught by the frontend, and the received parameters are forwarded to our backend in a separate call.
Step three - the token exchange
In this step, our backend can make a POST request to the /token endpoint of the authorization server and exchange the authorization code for tokens. This request must have a content-type header with the value application/x-www-form-urlencoded and an Authorization header with Basic <base64 encoded client_id:client_secret>. The body should contain a form-encoded version of the following parameters.
- grant_type - required and must be
authorization_code - code - required, the authorization code that we received in Step 2
- redirect_uri - required, no actual redirect happens here, this is only for validation purposes. Must be exactly the same
redirect_urithat we have provided in Step 1
POST https://authserver.com/token

content-type: application/x-www-form-urlencoded
Authorization: Basic MTIzOmFiYw==

grant_type=authorization_code
code=1234ABC
redirec_url=https://awesomeapp.com/callback
In the response, we will receive the following information:
{
   "access_token": "Ae4K9lu...fdg32E",
   "token_type": "Bearer",
   "scope": "openid email",
   "expires_in": 3600,
   "refresh_token": "w1RT_gF...Gh_9p"
}- access_token - the token that we need to access the user's resources on the resource server. This is what we were working for! Can be a random string, but also can be a JWT containing some useful information, depending on the authorization server.
- token_type - always Bearer, shows us how the token can be used
- scope - the list of scopes granted
- expires_in - how long this access token is valid for in seconds
- refresh_token - optional, usually it is only returned if you listed the offline_access grant but depends on the authorization server. The refresh token can be used to get a new access_token without user interaction if that expires
- id_token - optional, if OpenID Connect is supported, and we asked for the openid scope we get this token with information on the user, see below
The id token
The id token is a JWT containing information about the user who gave us the consent. This information can be used for authentication purposes. The format usually looks something like the one below. The specs can be found here.
{
  "iss": "http://authserver.com",
  "sub": "user_id",
  "aud": "client_id",
  "exp": 1642262443,
  "iat": 1642258843,
  "name": "Jane Doe",
  "given_name": "Jane",
  "family_name": "Doe",
  "locale": "en",
  "email": "[email protected]",
  "picture": "http://service.com/customer.png"
}
There is a list of standard OpenID Connect claims that can be present here. The id token must always be validated before use. There are a few checks based on what claims were used; the full process is well explained here. In short, we always have to check the value of the iss and aud fields, make sure those match the client id and the issuer identifier. Also, the id token itself must be a valid JWT with a valid signature.
Step four - use the APIs
With our newly acquired access token, we can make API calls to the resource server and access data or take actions in the name of our user according to the scopes granted.
The access token must be attached to each call in the Authorization header
Authorization: Bearer <access_token here>Besides all the new API endpoints available to use there is a special one that comes with OpenID Connect called /userinfo . This endpoint can be accessed using the access token, as shown above. This endpoint can return the same information that is present in the id token itself.
Step five - refresh the access token
The access tokens are usually short-lived ones, they are generally good for 30-60 minutes, depending on the auth server settings. Once the access token expires our API calls using it will get 403 or similar responses.
Luckily the refresh token lives much longer, in many cases 60-90 days even. We can use the /token endpoint again to get a new access token in exchange for the refresh token.
POST https://authserver.com/token

content-type: application/x-www-form-urlencoded
Authorization: Basic MTIzOmFiYw==

grant_type=refresh_token
refresh_token=w1RT_gF...Gh_9p
The response to this should be very similar to the original /token endpoint call, providing new access and refresh tokens. It is worth saving both again since in many cases refresh tokens can only be used once.
Good to know
- If the refresh token expires we have to re-authorize, repeat the whole process from the start. It is a good idea to store access and refresh token expiry times, and do an auto-refresh if the refresh token is about to expire.
- When used, refresh tokens often become invalidated within a short time period. With the received new access token, you should also save the new refresh token you get!
What's next?
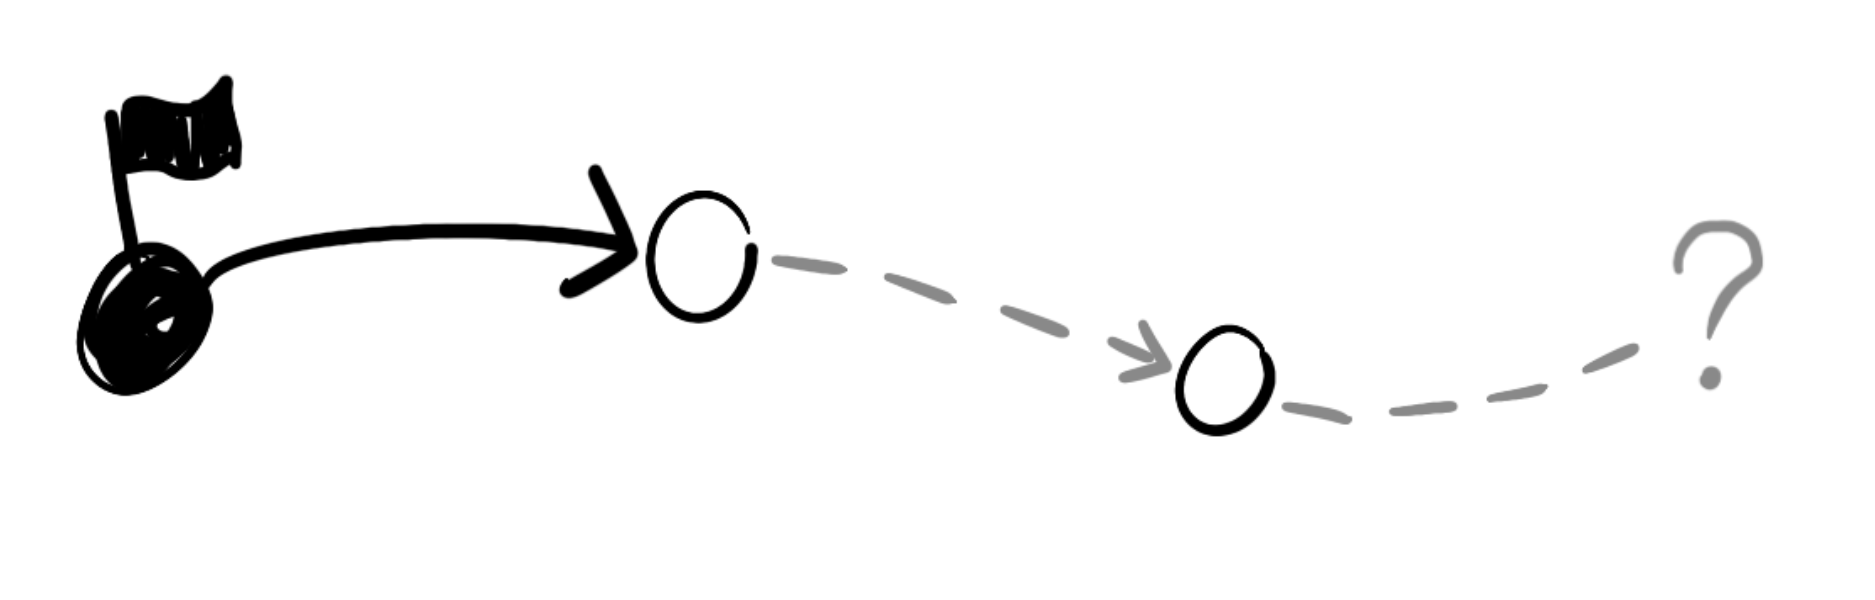
In the next part of this series, I will talk about a Java Spring implementation of the Authorisation code flow, tailored for modern web applications. Later I will discuss various strategies for token management too.
Useful to read
These articles helped me the most to understand OAuth and all the things around it, definitely a recommended read. The guys at Okta surely know what they are doing when it comes to security.
The Google OAuth playground is a good way to experiment with the various calls and parameters

Clear and full documentation on how to use Spotify's OAuth
https://developer.spotify.com/documentation/general/guides/authorization/code-flow