Creating a Gradle multi-module project
Using Gradle multi-module build is easy and makes Spring Boot application development just better. Refactor your code to a multi-module structure, and improve quality and maintainability with this tutorial.

A modern Java Spring project often has multiple parts that would make sense to separate, be able to build, and deploy separately. These can often be the core of a service, and a client for other services to use when they want to call ours. Another scenario is when we are creating multiple implementations for some interface, let's say we integrate multiple third parties (accounting software for example). We want our core service and logic to be third-party independent so we define interfaces between the partner-dependent implementations and the core logic. The core service, the interface package, and all the implementations can be separate modules.
This structuring makes our code nicely structured and easier to manage the modules independently. By defining the dependencies between our modules, we can enforce rules on what can be called avoiding creating spaghetti code and keeping everything nice and tidy. So how can we create these awesome modules?
Multi-module project
Project structure
Both Gradle and Maven support multi-module builds, in this article I will show you the Gradle version as I'm more familiar with that.
In my example, we will create a core service, a plugin interface, and 2 implementations of the interface that the core service uses.
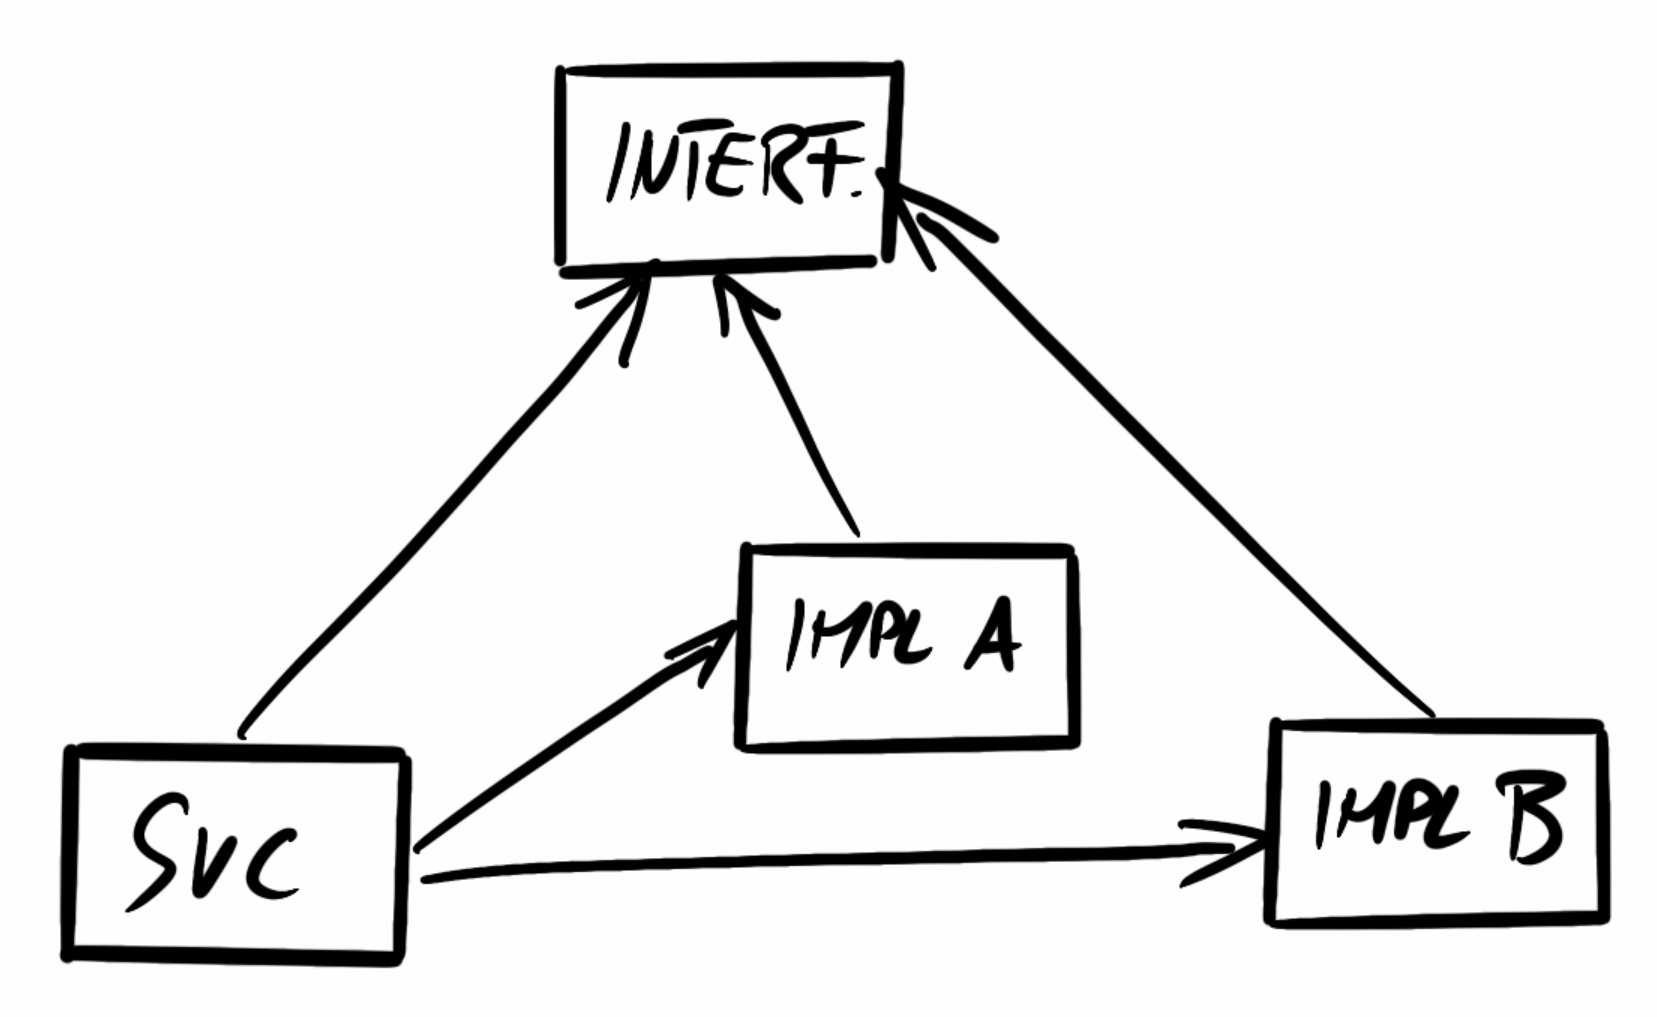
- The service defines the core business logic, our program that we run
- The interface module has all the interfaces and model objects that the service can call to use the concrete implementations
- Implementations A and B are 2 implementations of the logic needed by the service
The project structure for this looks like the one below.
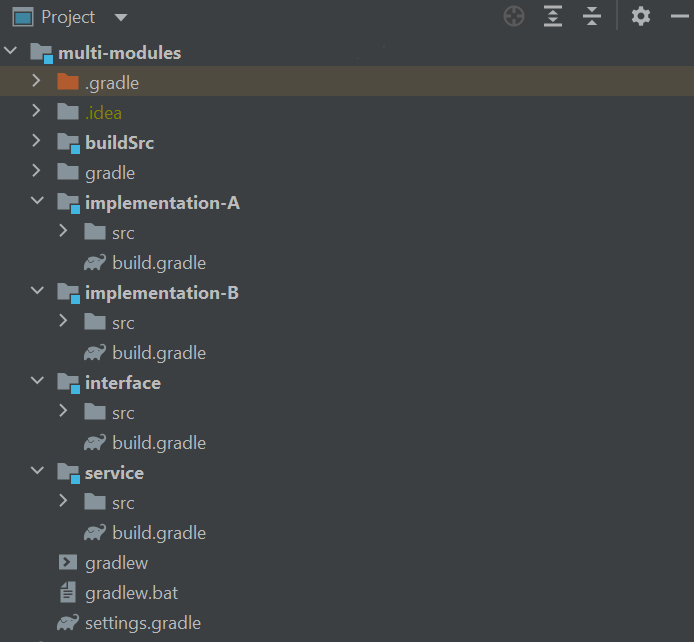
The root project is called multi-modules, that one does not have a build.gradle file, only a settings.gradle with the following content, defining the submodules.
rootProject.name = 'multi-modules'

include 'interface'
include 'service'
include 'implementation-A'
include 'implementation-B'
Dependencies between the modules can be defined in the build.gradle files, in the dependencies section like this (from the service module):
dependencies {
    implementation project(":interface")
    implementation project(":implementation-A")
    implementation project(":implementation-B")
}Sharing configurations
Each submodule has its own build.gradle file with all the configurations and settings for the given module. This can however lead to many duplications amongst the files. We want to use the Gradle Java and other plugins in each module, we may also want to use the same external dependency in multiple modules. Adding this separately to each individual build.gradle would be very hard to maintain and messy. Lucky for us we can create local Gradle plugins called convention plugins in the special buildSrc folder that define these common dependencies, configurations, and build scripts. Afterward, we just have to add these custom plugins to all our modules where needed.
In our example the structure of the buildSrc folder looks like this:
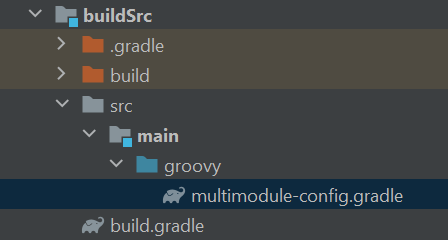
build.gradle:
plugins {
    id 'groovy-gradle-plugin'
}multimodule-config.gradle:
plugins {
    id 'java'
}

sourceCompatibility = JavaVersion.VERSION_17
targetCompatibility = JavaVersion.VERSION_17

repositories {
    mavenCentral()
}

test {
    useJUnitPlatform()
}

dependencies {
    compileOnly 'org.projectlombok:lombok:1.18.24'
    annotationProcessor 'org.projectlombok:lombok:1.18.24'

    implementation 'ch.qos.logback:logback-classic:1.2.11'
}
This convention plugin called multimodule-config when applied will add the Java plugin, source, and target versions repositories test platform to use and a few dependencies to each subproject. I used this for all, for example in the service module I just add the lines
plugins {
    id 'multimodule-config'
}
to my build.gradle and that is it. We can create a lot of these convention plugins to group specific dependencies and configurations like spring-conventions, java-conventions and so on.
There are more tricky situations, unfortunately. Let's say we have a Spring project and multiple modules require Spring boot dependencies. We want to use and specify the Spring Gradle plugin and all spring dependencies only once. If we try to add the Spring plugin to our convention plugin we will get an error.
multimodule-gradle.gradle:
plugins {
    id 'java'
    id 'org.springframework.boot' version '2.7.0'
}

...
Will produce the following issue:
Invalid plugin request [id: 'org.springframework.boot', version: '2.7.0']. Plugin requests from precompiled scripts must not include a version number. Please remove the version from the offending request and make sure the module containing the requested plugin 'org.springframework.boot' is an implementation dependency
If we simply omit the version number the build won't find the plugin and fail. What we have to do is to add the Spring boot plugin as an implementation dependency in the build.gradle file for the buildSrc folder. Don't forget to add the maven central repository too!
plugins {
    id 'groovy-gradle-plugin'
}

repositories {
    mavenCentral()
}

dependencies {
    implementation 'org.springframework.boot:spring-boot-gradle-plugin:2.7.0'
}
And this is how you create a Spring Boot Gradle multi-module project!
Examples from this article can be found here:
 Timester
Further info on Gradle multi-module usage: